Targeting Android, iOS, and Windows with React Native
Facebook’s React Native framework makes it easy to build native Android, and iOS apps with JavaScript. Thanks to a plugin from Microsoft, this framework can also target the Universal Windows Platform. How well does “Learn Once, Write Anywhere” hold up with an app that targets all three?
Legacy Code Warning!
The content of this post is severely outdated. It covers an older version of React Native and Windows 10, which have both released major updates since the original publication. I’m leaving this article available for archival purposes, in case it’s useful to someone.
Limitations
First, Microsoft’s plugin for React Native only creates apps for the Universal Windows Platform, and WPF. Universal apps will only work with Windows 10, while React Native WPF apps can run on Windows 7 or higher. While most of the getting started tutorials for React Native use Expo, it doesn’t currently support UWP, so we’ll lose out on its capabilities, across all platforms. Similarly, most React Native developers are only targeting iOS and Android, so third party libraries might not function as advertised on Windows, if they work at all. The developers behind these libraries may be reluctant to release patches to address Windows-specific bugs—even if you submit the patch, yourself.
It’s also important to understand exactly how React Native approaches cross platform development. This quote from the ReactJS.org blog sums it up well:
It’s worth noting that we’re not chasing “write once, run anywhere.” Different platforms have different looks, feels, and capabilities, and as such, we should still be developing discrete apps for each platform, but the same set of engineers should be able to build applications for whatever platform they choose, without needing to learn a fundamentally different set of technologies for each. We call this approach “learn once, write anywhere.”
In other words, React Native sacrifices some of the simplicity you’d get from a Java-like approach, in favor of making it easier for developers to tailor the app to each supported platform. The business logic may be shared across all versions of the app, with different interfaces for Android, iOS, and Windows. This seems like a decent trade off. While I’d prefer to reuse code wherever possible, I don’t want to build something that looks completely out of place on a user’s device:
Old school Java/Swing looked equally out of place on Windows, OS X, and Linux, so I guess that counts for something.
Finally, the React Native Windows plugin is still a work in progress, and doesn’t support every single feature of React Native. To get an idea of where things stand, see the project’s Core Parity Status page.
Prerequisites
Without Expo, we’ll need the full iOS SDK in order to get our app up and running on iOS devices. This means we’ll need access to macOS with XCode, as well as Windows for Visual Studio 2017. We’ll also need the Android SDK, which runs on macOS, or Windows, as well as Linux, if you want to use three operating systems.
React Native, itself, will need to be installed, and configured on both platforms. Follow the steps outlined in the React Native Getting Started page, for building projects with native code. This essentially boils down to installing Node.js and NPM on both platforms, as well as the requisite development environments, and the command line interface for React Native.
For the Windows portion, Microsoft has its own Getting Started guide. Again, this requires a supported version of Windows, as well as Visual Studio 2017. Fortunately, the free Community edition of Visual Studio, like store bought, is fine. Note that, as of publication, React Native Windows requires the exact Windows SDK version 10.0.14393.0 to be installed.
Since this app will need to be compiled on multiple operating systems, you’ll need to keep the different copies synced, preferably with a version control system, like Git.
Hello, World!
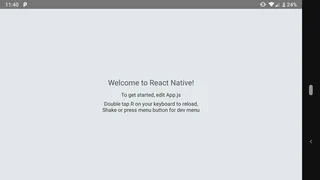
With all of the necessary software installed, we can go ahead and fire up the terminal, and type react-native init hello to set up a new project. This creates a new React Native project called hello, and fetches all of the dependencies necessary to make it work.
From the terminal, we’ll need to move to the hello directory, and run npm install --save-dep rnpm-plugin-windows to add the Windows plugin, and then npm install. At this point, we can run react-native windows, to get the app ready for Windows. Once the plugin finishes creating the Windows solution, we can test the project with react-native run-windows. It will take some time to get everything ready to run, and it will prompt you to install a certificate on the first run:
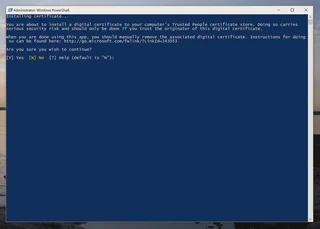
You can trust me, right?
But, soon enough, your brand new React Native app will pop up:
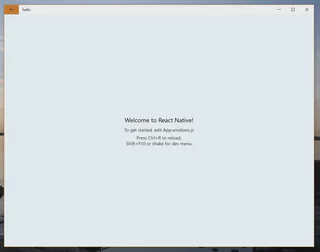
Fun fact: that “shake for dev menu” gesture actually works on the Surface Pro 4. It feels exactly as ridiculous as you’d expect.
With that running, I plugged in my Google Pixel XL, and ran react-native run-android, to get them both running the app. At this point, I realized I needed to add the path to the Android SDK to a new <project-folder>/android/settings.local file, which only contains the line sdk.dir = <path to SDK>. On Windows, Android Studio places the Android SDK at C:\Users\<username>\AppData\Local\Android\Sdk. This file should be excluded from the version control repository, as the SDK path will vary for each system.
Running on Android, in landscape mode.
It’s important to note that React Native Windows created a platform-specific JavaScript file for the Windows UI, so we’ll need to keep some degree of parity between them, when implementing features. Again, React Native isn’t trying to achieve Java-style “write once, run anywhere” cross platform support, but rather enable developers to tailor the app to each supported platform.
Playing around with the JavaScript, we can see some of the techniques that React Native offers for catering to different platforms. In the default App.js file, there’s an example of a Platform.select() statement, that can be used to assign different values to a variable, depending on the platform. React Native Windows takes a more extreme approach, adding a completely new App.windows.js file with Windows-specific code. To demonstrate, I made a few slight modifications to these files:
App.js
import React, {Component} from 'react';
import {Platform, StyleSheet, Text, View} from 'react-native';

const thisPlatform = Platform.select({
  ios: 'iOS',
  android:
    'Android',
});

type Props = {};
export default class App extends Component<Props> {
  render() {
    return (
      <View style={styles.container}>
        <Text style={styles.platform}>{thisPlatform}</Text>
        <Text style={styles.filepath}>This file is App.js</Text>
      </View>
    );
  }
}

const styles = StyleSheet.create({
  container: {
    flex: 1,
    justifyContent: 'center',
    alignItems: 'center',
    backgroundColor: '#3c3c3c',
  },
  platform: {
    fontSize: 20,
    textAlign: 'center',
    margin: 10,
    color: '#cecece',
  },
  filepath: {
    textAlign: 'center',
    color: '#cecece',
    marginBottom: 5,
  },
});
App.windows.js
import React, { Component } from 'react';
import {
  Platform,
  StyleSheet,
  Text,
  View
} from 'react-native';

export default class App extends Component<{}> {
  render() {
    return (
      <View style={styles.container}>
        <Text style={styles.platform}>
          Windows 10
        </Text>
        <Text style={styles.filepath}>
          This file is App.windows.js
        </Text>
      </View>
    );
  }
}

const styles = StyleSheet.create({
  container: {
    flex: 1,
    justifyContent: 'center',
    alignItems: 'center',
    backgroundColor: '#003c6d',
  },
  platform: {
    fontSize: 20,
    textAlign: 'center',
    margin: 10,
    color: '#9dceff',
  },
  filepath: {
    textAlign: 'center',
    color: '#9dceff',
    marginBottom: 5,
  },
});
This version of the app displays the current platform, and the file that’s being displayed. I set the background color to dark gray on Android/iOS, and dark blue on Windows. Running the app on Windows, and Android, we get the following:
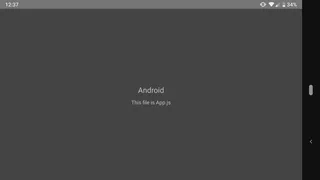
Running on Android, in landscape mode.
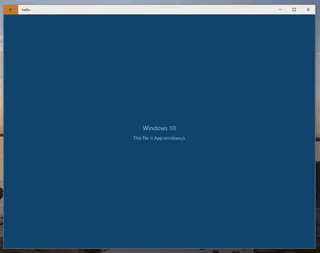
The results of the code above. As you continue editing, periodically shake your 12" tablet like a crazy person, to hot reload the app.
There’s a lot more to cover with React Native, like the available controls, integrating native code, or how to package this as a production-ready application, but that’s beyond the scope of this already 1300+ word installment. For the next one, I plan to start developing a real world application. Until then, feel free to check out some of the React Native documentation, to get a feel for the framework.
Whoops!
I never actually wrote a follow up to this article, and have since moved on to Compose Multiplatform for my cross platform app development needs.