Test Driving the Chrome OS Linux Beta with Node.js
With support for Linux applications rolling out to recent Chromebooks, I decided to try setting up Node.js on a Samsung Chromebook 3. Here’s how it turned out.
Some Background
Since Chrome OS is built on top of the Linux kernel, the OS has offered some degree of support for Linux applications for some time. Previously, users would have to enable developer mode, and set up a chroot environment with Crouton. This would allow the user to run a desktop environment such as KDE or XFCE alongside the native OS. However, this option disables boot verification, and doesn’t provide a fully seamless experience.
More recently, Google has started rolling out a more integrated solution, through its Linux Beta. This downloads a virtual machine for running Linux apps without using the Developer Mode. GUI applications show up in the usual Chrome OS window manager, rather than needing a separate window manager. While this was initially exclusive to Google’s Pixelbook, support has started rolling out for other devices.
For devices that support the Linux Beta, a new section will appear in the system settings. To enable the feature, the system downloads, and installs the necessary virtual machine. Once the process completes, a new terminal window will appear. Run sudo apt update and sudo apt upgrade to finish setting up the VM.
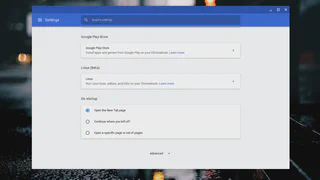
On supported devices, a Linux Beta section appears in settings
Getting Node and Code
We’ll need to download the Node.js, and Visual Studio Code packages from their respective sites. While a nodejs package does exist in the VM’s repositories, that package currently installs a fairly outdated, and unsupported version of Node.
When visiting the Visual Studio Code website on Chrome OS, it automatically detects the operating system, and offers two download options for Linux. Since the Linux Beta VM is based on Debian, we need the .deb package. Similarly, for Node.js, we can grab either the Long Term Support release, or the latest version from the main page.
Once the packages are downloaded, we run into the first complication, as the Linux VM does not have access to the entire file system. Fortunately, the Files app allows us to copy the package files to the proper directory, appropriately labeled as “Linux files”, which appears under My Files, on the left panel.
Since Visual Studio Code provides a .deb package, we can install it with dpkg -i <package-file-name>. The dpkg command may complain about missing dependencies, which you will need to install with sudo apt install <package name>.
The Node.js package is distributed in .tar.xz format, and needs to be decompressed in an appropriate folder, as described in this Node.js installation page. This boils down to creating the directory (e.g. /usr/local/lib/nodejs), and extracting with sudo tar -xJvf <package-file-name> -C /usr/local/lib/nodejs. We can make the commands accessible by creating links for node, npm, and npx in /usr/bin (e.g. sudo ln -s /usr/local/lib/nodejs/node-v10.15.1-linux-x64/bin/node /usr/bin/node).
To verify installation, we can test the Node REPL, and launch Visual Studio Code. The latter is accessible through the standard launcher, in a folder called Linux Apps.
Creating a Project
To create a quick test project, we can create a new directory (e.g. testapp), run npm init from within the project directory, and follow the prompts to create a basic package.json file. To create an Express.js app, run npm install express --save. For an extremely simple test, we can grab the Express Hello World Example, and save the file as index.js in the same folder as the package.json file.
index.js
const express = require('express');
const app = express();
const port = 3000;

app.get('/', (req, res) => res.send('Hello World!'));

app.listen(port, () => console.log(`Example app listening on port ${port}!`));
To test it, run node index.js. The example app creates a server, listening on port 3000. To verify this, we can navigate to localhost:3000 in a Chrome tab.
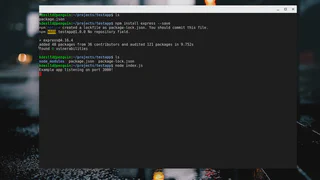
The Hello World app runs in the terminal.
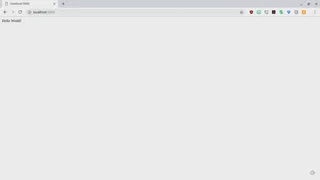
A Chrome browser displays the message.
Conclusions
Overall, the process for setting up a Node.js development environment on Chrome OS isn’t much more complicated than on a typical Linux system. Performance will vary depending on the specs of the particular device being used, but even a Celeron based system like the Chromebook 3 should be able to handle the kind of apps one might deploy to a free or hobbyist dyno on Heroku. A more powerful device like the Pixelbook could easily handle more demanding development environments, such as Android Studio, or IntelliJ Idea.
Of course, Linux app support is still beta software, with occasional bugs. At the time of writing, for example, the minimize button in Visual Studio Code doesn’t work on my machine, though other applications like GIMP don’t seem to suffer from this issue. And, by design, Linux apps don’t have access to the entire file system, though they do use a shared clipboard, so copy and paste works across Chrome, and Linux as expected.
Despite the quirks, and limitations, the addition of Linux app support in Chrome OS makes Chromebooks significantly more useful as development machines, and may even make premium devices like the Pixelbook significantly more practical.